All text and photographs © Emil von Maltitz 2009

The Dodge Burn Layer


One of the easiest ways in which to deal with local tonal values is by dodging and burning. The term given this technique is taken directly from the original manner in which traditional photographic film printers (you remember that thing called film?) would allow portions of the image to remain under the enlarger lamp for a longer period than other areas through the use of masks, wands and any number of odd shaped bits of card which were placed between the lens and the easel which held the photographic paper in place. While learning photography I spent many hours in a darkroom tackling image after image, wishing I had more than two hands to hold the assortment of wands and masks to hold back light over highlights and burn in areas where I wanted strong shadows (or vice versa). The premise was simple: Allow light to ‘burn’ the print for a darker area and for more contrast and ‘hold back’ or dodge by blocking light from falling onto the paper, thereby allowing it to remain lighter in tonal value and also reduce contrast.

Waterfall before dodging

The image of a waterfall in the Drakensberg before any enhancement

Until CS4 came along many Photoshop practitioners practically had a hernia if you suggested using the dodge/burn tool (shortcut key ‘o’ – use this and ‘SHIFT’ to cycle through the individual tools). Even though CS4 has vastly improved dodge/burn functionality, I still find myself using the dodge/burn layer for its ease of use and functionality when used in conjunction with luminosity masks.

For this exercise I have chosen a relatively simple image to demonstrate the strength of the dodge/burn layer. In the initial assessment I’ve noted the area to the top left of the image which is lacking contrast and looks a little washed out, while the lower right of the image is too deeply in shadow. At the same time i'd like to darken the lower edges and corners of the frame to draw the eye in towards the waterfall itself.

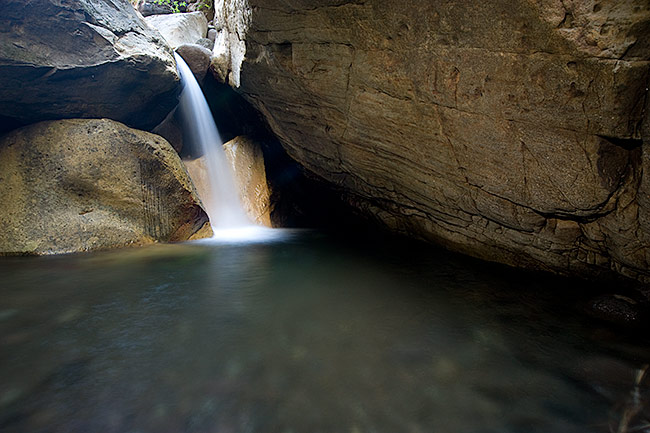
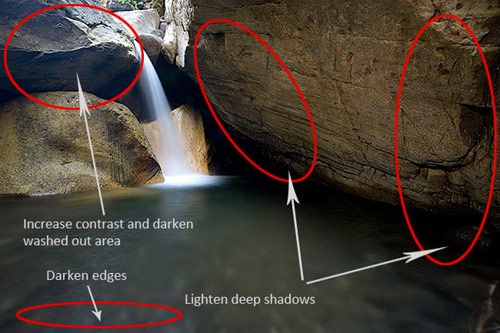
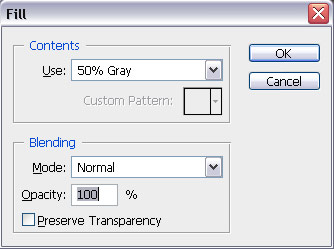
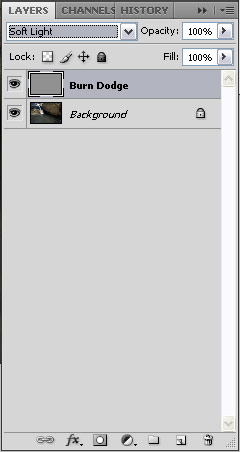
To create the dodge/burn layer click on the ‘create new layer’ icon (or hit SHIFT + Ctrl + ‘n’). An empty layer will appear above your background image layer. Rename the layer Burn Dodge (this is simply good house-keeping – when you have 10 or more layers it’s far easier to find the one you are looking for when they each have a name). Next, go to Edit>Fill (or hit SHIFT + F5). The whole image will go grey. Move to the layers palette and click on the blend mode drop down menu (next to the opacity slider) and select ‘Soft Light’. The background image will now reappear.

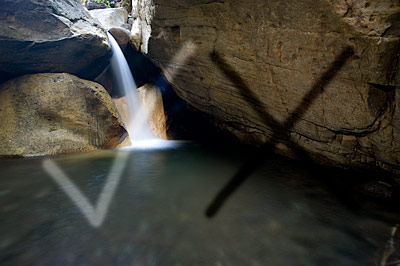
What has been created is a neutral 50% grey layer that matches the ideal middle tone. By applying white or black ‘paint’ we lighten or darken the layer, thereby lightening (dodging) or darkening (burning) the pixels in the layer below. The next step then is to apply the paint. Go to the paintbrush tool in the tools palette (or hit ‘b’). Right click on the image to pull up the dialogue for your brush. Choose the size brush that best suits the area to be adjusted and ensure that it is well feathered (harness should be at ‘0’). To demonstrate the effect of the applied ‘paint I have simply created a tick in white ink and a cross in black.

For the actual dodging and burning a brush with a diameter o4 400 and a hardness of 0 works well. As seen in the tick/cross example the changes can be quite dramatic. To apply less ‘paint’ and therefore have a more subtle effect while having better control at the same time set the opacity of the brush to a lower percentage. I like working with an amount of between 8-10%. This means that you apply the ‘paint’ in gradual amounts. If you prefer, you can always increase the opacity, but it is easier to start low and build up from there.


fill dialogue Layers palette
The Layer Palette ('F7') showing a renamed dodge burn layer and the blend mode set to Soft Light
The Fill layer dialogue (Edit>Fill of SHIFT + 'F5'
tick_cross
Opacity_Slider Colour_Swath

When working with the brush tool a few shortcut keys for the colour swatch (the small squares at the bottom of the tools palette) are useful to remember. The swatch itself shows the colour you are painting with as the top square, and the background colour as the lower square. When you are in any tool that utilises the colour swatch the shortcut key ‘x’ will cycle between the foreground and background colours. The key ‘d’ will reset the colours to black as the foreground and white as the background.

After some liberal dodging and burning you can see the before after results below (rollover the image to see the unaltered version). This image was taken straight from RAW without any alterations. The ONLY thing I have done is to apply dodging and burning. This should be example enough how powerful the dodge/burn layer is. The beauty of having it as an individual layer of course is that it can easily be undone.

Rollover the image to see the unaltered version


PDF Download the pdf. file of the tutorial

Back to Tutorials