As something of a personal exercise, I have always wanted to know the merits of various blending techniques for High Dynamic Range Images. The next few articles will therefore deal individually with three hand blending techniques for creating images with an expanded Dynamic Range. I personally find that automated results, although aesthetically interesting, do not capture the ‘look’ that I am after, and have thus tended to stick with hand blending my HDR images.
HDR – an introduction to the concept
 |
Currently all conventional image capturing media have a limited tolerance to the amount, or lack thereof, of light that can be recorded. Light, for the photographer, is measured in a series of ‘stops’ from what we could essentially term as pitch dark, through to the brightest light. These stops are exponentially arranged such that a darker tone is half the amount of light as the tone or stop above it, and a lighter tone is double the amount of light than the tone or stop below it. This relationship is easily seen in the arrangement of shutterspeeds where each shutterspeed lets in either double, or half the amount of light as the next shutterspeed below or above it respectively (see diagram).
A good light-meter can measure light from 22 to 23 light values or EVs (Exposure Values). The best light meters start art -2 and run through to 21 or 22 EVs. As a rough approximation, though, our own eyes can only see detail in a tonal range of say 13 to 15 stops. If there is a scene presented to our eyes that falls below or above that range, we find ourselves squinting to try and compensate for the brightness or darkness of the subject that we are trying to see.
Photographic media has a similar problem in that it cannot capture the whole tonal range before it with true fidelity. In fact, it has an even harder time than our eyes have when trying to capture detail of different tonal values. It is generally accepted that good black and white film holds the trophy for having the best ability to capture a wide range of tonal values within a scene. This ability is known as the exposure latitude of film. With digital capture devices we tend to discuss dynamic range rather than exposure latitude, although the two are basically interchangeable. Good Black and White film had an exposure latitude of 11-12 stops. Good colour print film tended to have an exposure latitude of around 7-9 stops. |
Colour transparency film tended to be the loser in this department with between 2-5 stops of exposure latitude (depending on the film). Digital cameras tend to capture between 7-9 stops of light. This sounds great, but in practice, due to the way that CCD and CMOS sensors capture light, they perceptually appear to have a lower dynamic range than films with an equivalent exposure latitude, and even transparency films with a lower exposure latitude. This perception of greater dynamic range in a film image falls away as soon as the image is scanned with anything other than a drum scanner as one is back to the equivalent of a CCD image capture.
The zone system for digital Photographers
The secret to Ansel Adams technique was that it allowed the photographer to expand or condense the tones in a scene into 10 stops or zones on a grade #2 paper by increasing or decreasing the length of time that the negative was developed for. The actual scene may have had less or more than 10 stops of light from deep shadows through to bright highlights, but with careful application of Adam’s zone system, it was possible to reproduce those tones into ten visible tones in the final print.
The important thing to note is that Zone 5, which was middle grey for Adams, is not the same thing as 18% grey in the actual scene. The photographer chooses what will be reproduced as zone 5, whether it is close to a tonal 18% grey or not.
HDR allows the digital photographer to approach the same style of imagery as Adams’ that condenses a wider range of tonal values into a tonal range that can be handled by a computer monitor or paper print. Here again, one should note that it is the photographer’s choice as to what tones will be reproduced at an approximate 18% grey and that they are not necessarily the same as the actual 18% grey tones in the scene that is photographed. |
|
The long and the short of it that both film and digital capture suffer from the same inherent problem of recording the full gamut of tonal values in a scene onto their light sensitive media. With film (and still with digital) this can be partially overcome by using Neutral Density graduated filters as supplied by LEE and Cokin. Depending on the strength of these filters it is possible to hold back a portion of the scene by a number of stops. For instance, in photographing a sunrise at a shutter speed of 1/125sec, the sky may be the equivalent of f22 while the foreground is the equivalent of f4 – 5 stops of difference between the foreground and the sky. Most digital cameras will be able to handle that amount of latitude, but Fuji Velvia, a favourite among landscape photographers would have either lost details in the highlights or in the shadows depending on which was exposed for. By using a ND grad filter the sky can be brought back to 11, only 3 stops difference, and therefore within the exposure latitude of the film.
Admittedly the example above demonstrates an exposure difference between the sky and the foreground that could have been handled by a digital camera. However, it is common to photograph scenes where there is up to a 10 stop difference between the highlights and the shadows in a photograph. Another issue that arises is that not all scenes are neatly divided along a horizon line between the high tone value portion of the image, and the shadow tone portion of the image. Consider photographing through a doorway. Here the shadow values of the image are the door-frame itself while the highlight values of the image are scene though the doorway. Sadly there is no such thing as a doorway shaped ND graduated filter, so we need to find another way of balancing the exposure between the door frame and the exterior that doesn’t blow out the highlights or turn the shadows into pure black.
The answer lies in High Dynamic Range Imagery, or HDR. HDR images are created by blending multiple exposures, with different exposures for the highlights, middle tones and shadows, together into a single image. This is not entirely a new technique and was used for years by film photographers. Digital scanning of transparencies also makes HDR far easier for film photographers. Nevertheless it is in digital photography where HDR has become synonymous with contrasty images taken at times when one would expect shadows and/or highlights to be lost. |
HDR allows for an incredible range of images to be produced that would previously have been extremely difficult to capture. In particular it allows for an extremely artistic interpretation of our world. One only need Google HDR and look at the resultant images to realise that the technique can be used to create visually arresting images that have little to do with our own visual perception of the world. That is not my personal aim though. I attempt to use the technique in a fashion that does not scream ‘computer manipulation’ to the world. There are literally thousands of photographers who use the technique to create images that are very obviously HDR images. That is not my goal. Already this style is becoming passé and dated, particularly with the ease that photographers have in creating HDR images with the dedicated programmes such as Photomatix Pro and easyHDR. In my opinion natural-looking HDR images are most effectively created by hand-blending the images in an editing programme such as Adobe Photoshop.
Shooting for HDR
Regardless of the blending technique that is used for HDR, the images themselves have to be captured with HDR in mind. The automated approach (I do not necessarily recommend this but use it from time to time when I need to be fast) is to put the camera into auto-bracket mode, continuous frame advance and shoot of a 3 or 5 image burst in Aperture Priority (A on Nikon, Av on Canon) with about 1 stop difference between the exposures. Aperture Priority is better than Shutter Priority as we don’t want the depth of field to change in the image. Ideally the camera should be set on a sturdy tripod for this sequence, although in brighter conditions it is possible – just not advisable – to shoot the sequence handheld.
The slower, more considered and accurate approach is to work with the camera in manual mode on a good sturdy tripod. I first expose for the shadows such that my histogram shows that I am not clipping in the shadows and indeed even have a little bit of room before I would do so. I then shoot progressively upwards in shutter speed until I am no longer clipping in the highlights. Obviously, the idea is that there is no movement in the camera during these exposures. Problems arise with movement in the subject. Although it can be done, moving subjects such as waves along the shore and trees blowing in the wind are extremely difficult to HDR as the movement is then seen ghosting of these subjects in the final image. In more technical words, there has not been alignment or registration of the moving objects in the frames themselves during the blending process.
Simple Hand-Blending of Images in Photoshop
If you have not already done so, please read my article ‘Quick and Dirty Layers Tutorial’ as the following technique relies on a basic understanding of layers and masks.
Step 1: Open up the RAW converted images onto Photoshop’s stage.
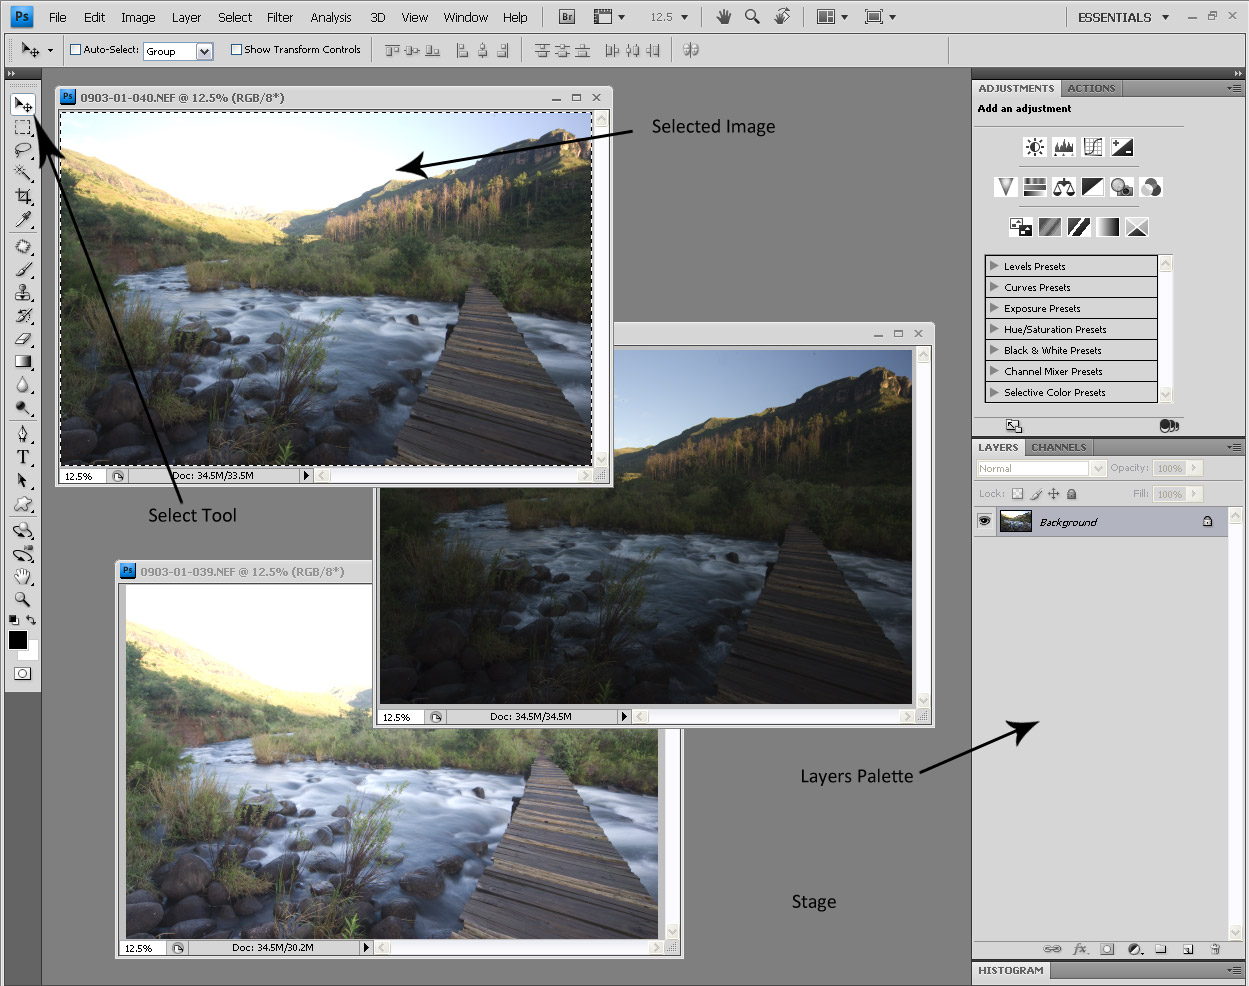
Step 2: Select and move your images so that they are all stacked on top of each other in a layer stack on one of the frames. The easiest way to do this is select the image (Ctrl + A), choose the move tool (V), then while holding SHIFT, left click and drag the selected image across over the image that has been chosen to have the layer stack above it. Pressing SHIFT allows for Pin Registration so that the edges of the one frame link to the edges of the frame below it. The image that was copied across can now be closed (Ctrl +W) after reselecting it. Follow the same process with any other images that will make up the final HDR. You should now be left with a single image on the stage with a layer stack consisting of each of the images above each other.
Step 3: While pressing Ctrl, select each of the layers in the layer stack by left-clicking on the grey tab next to the layer image. Once they are all selected (they all go blue or dark grey depending on the version of Photoshop) select Edit>Auto-align layers (you can choose the auto option). This aligns the three layers so that there is theoretically perfect pin registration between the images. It is often surprising that even with a tripod there is sometimes some movement between the frames (most usually caused when changing settings on the camera between frames). This step is absolutely essential if the frames were handheld.
Step 4: Rename the layers by double-clicking on the layer text. This is useful in order to keep track of which layer is where in the process. I’m going to rename my layers: ‘Shadows’ for the shadows optimised image, ‘Highlights’ for the highlight optimised layer etc.
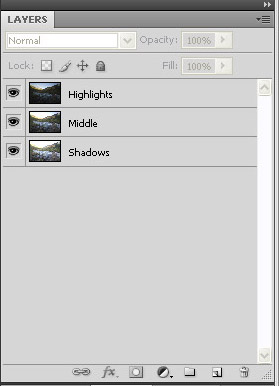 |
Step 5: Re-order your layers. Depending on the technique being used, the images need to be stacked accordingly. For this exercise I will stack the images so that the highlights layer is at the top and the shadows layer at the bottom. Depending on the type of masks that are used this can be switched around – the choice is up to the photographer once they understand the process.
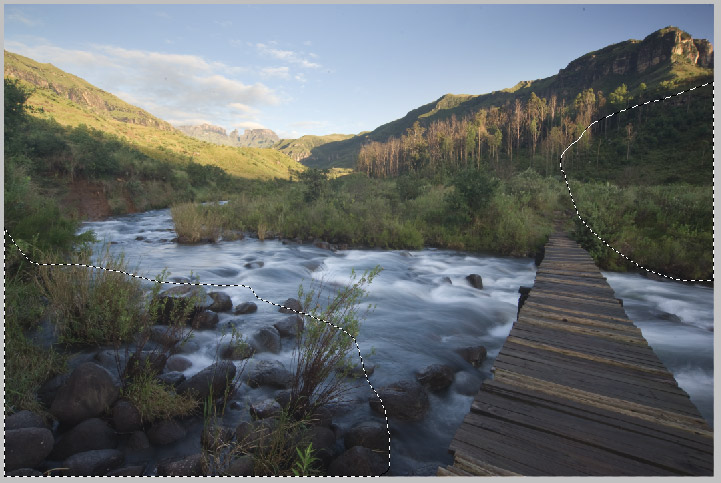
Step 6: Making a selection. There are various ways to go about making a selection. As usual for Photoshop, there are a million ways to skin the cat so to speak. There is no such thing as the right way to make the selection, only the best way for the image in question. By far the simplest technique is to create a mask and place a gradient over the area where you want two layers to blend together. This works particularly well with seascapes, or images where one would ordinarily have used a Neutral Density Graduated Filter (i.e. roughly flat horizons). For this particular example I’m going to create lasso selections as they are the easiest to understand. Choose the lasso Tool in the tool bar (shortcut ‘L’). And draw a selection around the area that you want to keep as the highlight portion of the image. This can be done quite roughly – I’m selecting the area just below the transition of the highlights. |
 |
Step 7: Create the mask. By creating a mask with the selection in place the selected area will remain – or be revealed - while the unselected portion will be masked off (hidden). The mask can be created either by clicking on the create mask icon at the bottom of the layer palette (it looks like an inverted Japanese flag), or by selecting Layer>Layer Mask>Reveal Selection.
Step 8: Blend the mask with a Guassian blur. Because the transition between the highlight frame and the layer below is clearly obvious, we need to blend the edges. The easiest way to do that is to place a Gaussian blur on the mask itself. Make sure the mask is selected and go to Filters>Blur>Gaussian Blur. Choose a setting that gives a very large soft blur to the edges of the mask, usually somewhere between 200 – 250.
Step 9: The next step is to create a selection of the areas that need to be optimised for the shadows. In the image you will notice that I have selected a portion to the lower left of the image and a portion to the middle right.
Because the selection being made on the middle layer and it is intended to show the layer below in the selected portion we now need to essentially invert the selection while creating the mask. The simplest way to do this is to hold down the Alt key while clicking on the create mask icon on the layers palette. Alternatively you can go to Layer>Layer Mask>Hide Selection.
Step 9: Adjust masks with Brush and continue with normal processing workflow. An advantage of this layers based approach is that I can now apply adjustments to the three separate layers. So, for example, if I want to increase the contrast in only the sky which has been selected as my highlight portion, I can create an adjustment layer that only affects the highlight layer.
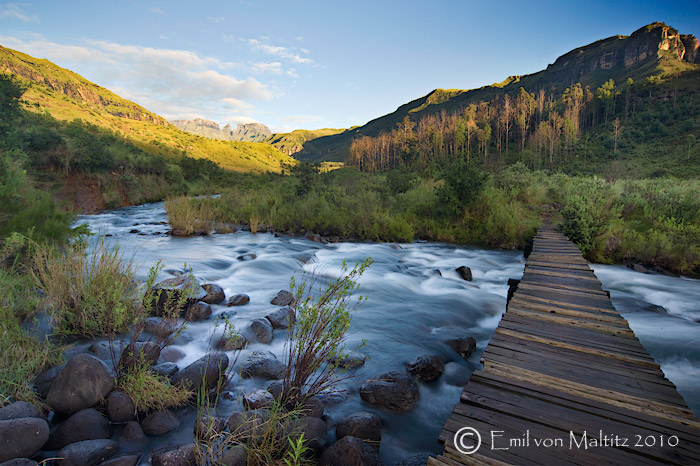
Below is what the image could end up looking like along with the layer stack that would get it to this stage:
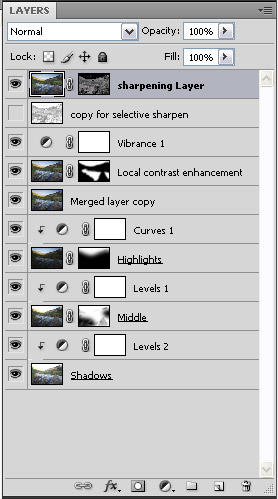
|