Click on the images for enlargements and technical details
Painting with Light – a Primer
One of the regular features of the workshops that I run is a session learning how to paint with light. Far and away this is one of the most popular sessions, with students raving about the possibilities that are now presented to them. Even things as simple as writing one’s name in light seem to get them excited. The irony of course is that painting with light is one of the easiest techniques to get to grips with. With the advent of digital photography it’s been made even easier in that one can now check the image on the LCD screen straight after you have captured it. Before, with film, you would have to wait until you had the film processed before you could see whether you made a mistake or not. What’s also exciting for photographers starting out with painting with light is that even the flops and duds often end up looking incredible.
|
|
|
The Basics
Although just about all cameras are capable of long exposures, you need to make sure that your camera can also shoot on ‘Bulb’. The Bulb setting is usually found under the manual mode and is set next to the slowest shutter speed (30 sec on most modern DSLRs). Bulb, essentially allows the shutter to remain open as long as you depress the shutter button. The longer you hold the shutter down, the longer the exposure. As an aside I believe that the term dates back to the days when cable releases had a pneumatic bulb which the photographer squeezed to fire the trigger to the camera’s shutter. As long as the photographer held the bulb tight, the shutter remained open. A few advanced cameras also have a ‘Time’ setting, which essentially allows you press the shutter once to open the shutter, and then press a second time to close the shutter. Sadly, this setting seems to have mostly disappeared from modern cameras and the last camera that I owned that had such a useful feature was my old Nikon F4s.
Since exposures are going to be longer than the camera’s longest shutter speed of 30sec (hence the use of Bulb) it becomes necessary to have a cable release with a lock feature. The lock allows you to let go of the shutter release button and get on with whatever you need to do while the shutter remains open. Since many novice photographers don’t own a shutter release cable there is a way around this – Use duct tape. Get two thin strips of duct tape (insulation tape also works) – one long and one short. Roll the short strip into a ball and stick it about half way along the long piece of tape. Stretch the tape across the camera grip by the shutter release button so that the ball of tape is over the button. Keep the lens cap on the lens and tighten the tape while wrapping it around the grip. Make sure that you hear the camera go ‘click’, and ensure that the tape is solidly positioned. Then remove the lens cap to begin your exposure. When you are finished the exposure, either release the tension on the tape (can potentially introduce camera shake), or replace the lens cap and then release the tension on the tape. It’s not a perfect technique, but in a pinch it allows you take extended exposures without a lockable cable release.
A tripod is also essential as you will be shooting long exposures. I have managed to get away with duct-taping students’ cameras to poles, cars and bridges, but nothing is really a decent substitute for a good tripod (and I’m afraid that gorillapods, although useful, are not ideally suited to these type of long exposures...I invariably end up having to use duct tape to bolster students’ cameras when they have brought along a gorillapod).
|
Camera Settings
Although I have always been a fan of film, this is where digital has a distinct advantage. Reciprocity becomes an issue with long exposures on film, meaning that you have to learn to apply different exposure compensations and often colour correcting filters for exposures over 1sec long (some films were better than others though). Digital, which records light in a linear manner, means that there is no reciprocity failure. The ability to fine tune white balance also means that we don’t need colour correction, although this is actually a chemical feature of film which forces a colour shift over long exposures.
My preferred settings for white balance are either UNI WB (a custom white balance that records the colour of light exactly as the camera sees ‘sees’ it) or Daylight WB. The reason why I prefer Daylight WB to Auto or even one of the incandescent settings is simply that I quite like the colour caste created by the mixed light in a ‘light painting’.
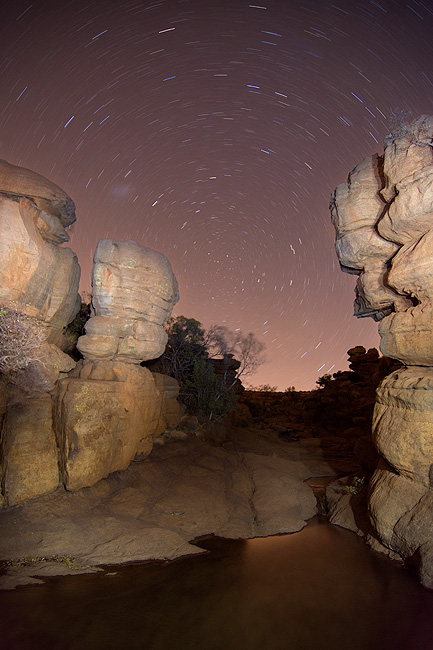
There is no such thing as the ‘correct’ settings for shooting a light painting. This is common misnomer among novice photographers that there are ‘correct’ settings for particular subjects or light. That said I usually start at around f5.6 on ISO 400. F5.6 is a useful starting point as it has some depth of field while being sufficiently large enough to allow light onto the sensor when the ambient light is very dark. Depending on how I visualise the final image I’ll adjust ISO and aperture. So, if I want a darker background I can lower my aperture or ISO. Some images involve quite low apertures so as to increase the exposure time in order to allow more accurate painting. |
|
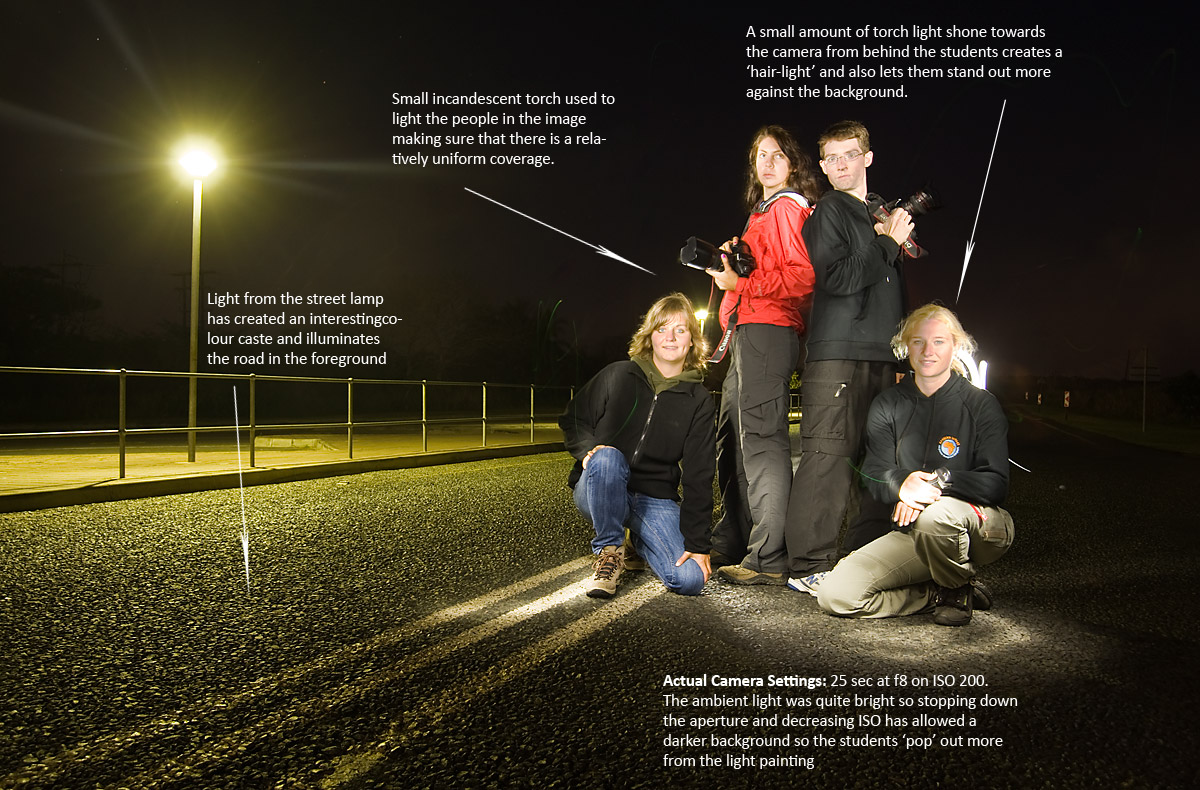
Painting’ literally involves using a light-source such as a torch (‘flashlight’ to Americans), candle or strobe to illuminate the subject. The light-source is used as you would a brush, waving it back and forth over the areas that you want illuminated. The closer you are to the subject the brighter and more condensed the illumination. The further you are from the subject the softer and more spread out the illumination. Turn the light-source towards the camera and you obtain a ‘line’ of light wherever you move the beam. With practice you can use the different techniques to good effect, choosing when you want condensed lights, bright lines and spread out illumination. Using a mix of lights, say a bright LED torch (condensed blue light), an incandescent torch (condensed orange light) and a flashgun (broad neutral light) you can create impressive compositions where the lighting becomes a feature of the image.
A South African photographer who has worked with and mastered this technique is Obie Oberholzer. His images demonstrate how painting with light doesn't have to only take place at night. One of his preferred tools is a 1000 candle power torch with which he paints the landscape. Darwin Wigget, a Canadian landscape photographer also uses the technique to great effect.
Once you get to grips with the concept of painting with light you will realise it is a relatively easy technique that boasts fantastic results. The concept can easily be extended to images taken during the day as well. A strong LED torch with it's concentrated beam can be used to light floral subjects for instance. Once you master a light-source as a brush, the possibilites are endless. |